Why You Should Add Copenhagen Plank to Your Fitness Routine?

The Copenhagen plank is a highly effective exercise that targets the inner thighs and core. Named after its origin in Denmark, this exercise has gained popularity in fitness and athletic training due to its ability to build strength and stability in these often-overlooked muscle groups. This comprehensive guide will explore the benefits of the Copenhagen plank, the muscles it targets, how to perform it correctly, common mistakes to avoid, variations, and how to incorporate it into your fitness routine.
Muscles Targeted by the Copenhagen Plank
The Copenhagen plank is a compound exercise that engages multiple muscle groups simultaneously. The primary muscles targeted include:
Adductors: The inner thigh muscles, including the adductor longus, adductor brevis, adductor magnus, and gracilis.
Core Muscles: The rectus abdominis, obliques, and transverse abdominis.
Hip Muscles: The hip abductors, including the gluteus medius and minimus, and the hip adductors.
Shoulders and Arms: The deltoids and triceps help stabilize the upper body during the exercise.
How to Perform the Copenhagen Plank
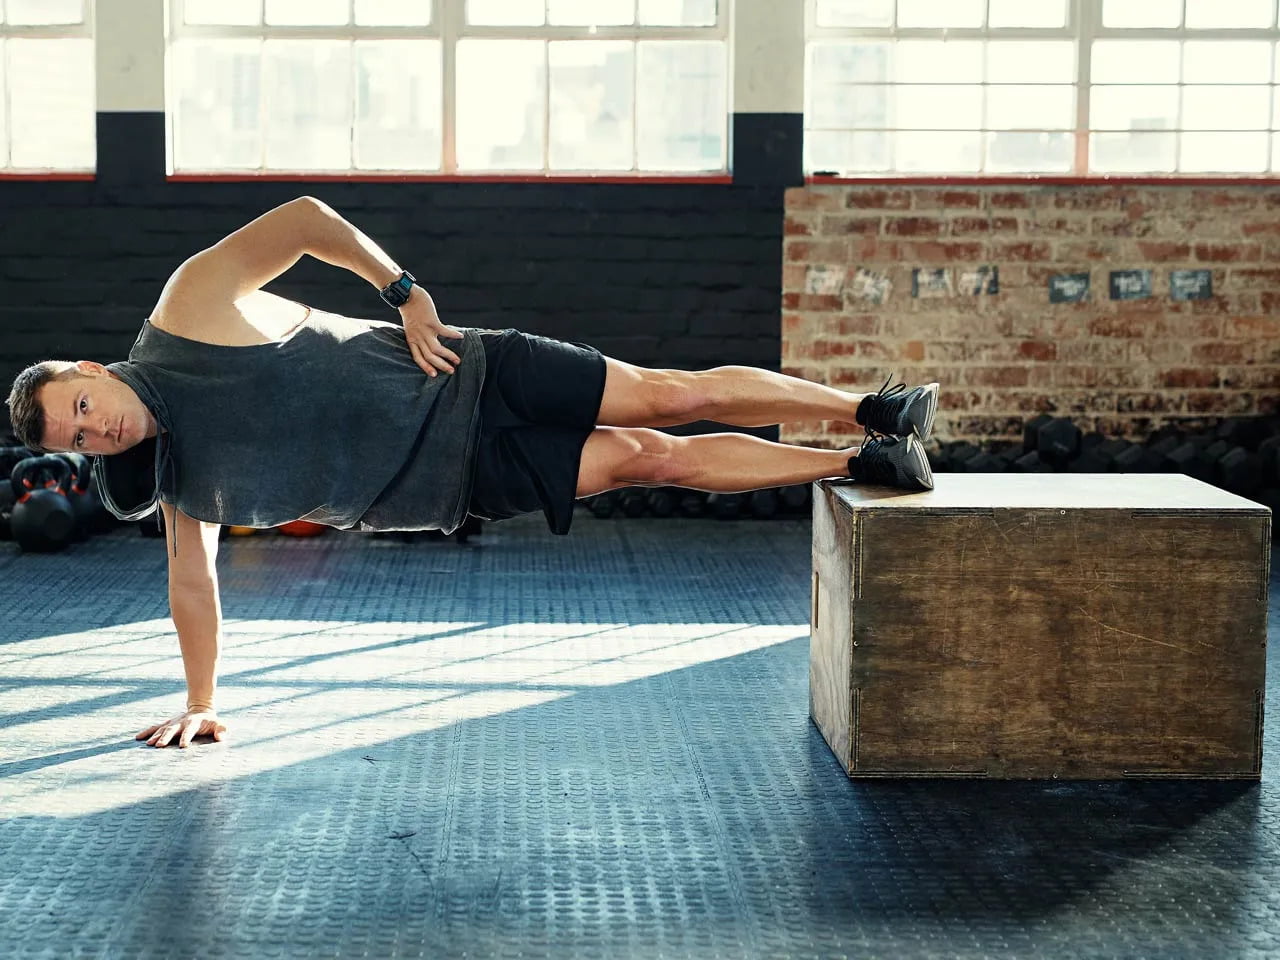
Doing the Copenhagen Plank correctly is important for maximizing its benefits and reducing the chance of injury. To complete the exercise correctly, follow these steps:
Starting Position:
- Lie on your side next to a bench, box, or raised surface.
- Place your forearm on the ground, ensuring your elbow is directly under your shoulder.
- Stack your feet on top of each other on the raised surface, with your top leg resting on the bench and your bottom leg underneath.
Lift into the Plank:
- Engage your core and lift your hips off the ground, creating a straight line from your head to your feet.
- Your body should be supported by your forearm and the side of your bottom foot on the raised surface.
Maintain Alignment:
- Keep your body in a straight line, avoiding any sagging or pike in the hips.
- Your shoulders, hips, and ankles should all be aligned.
Bottom Leg Position:
- Your bottom leg should be parallel to the ground and not touching it.
- This action engages the adductor muscles of the bottom leg intensely.
Hold and Breathe:
- Maintain this position for the desired duration, typically starting with 10-30 seconds.
- Focus on steady, controlled breathing throughout the hold.
- Avoid letting your hips sag or rotate.
Lower and Repeat:
- Slowly lower back to the starting position.
- Repeat on the other side to ensure balanced training.
Tips for Proper Form
- Keep your core engaged throughout the exercise to maintain stability.
- Ensure your elbow is directly beneath your shoulder to avoid unnecessary strain.
- Avoid letting your hips sag or rotate; maintain a straight line from head to foot.
- Start with shorter holds and gradually increase the duration as you build strength.
Benefits of the Copenhagen Plank
1. Strengthens the Inner Thighs (Adductors)
The primary benefit of the Copenhagen plank is its ability to target the adductor muscles of the inner thighs. These muscles play a crucial role in stabilizing the hips and knees, which is essential for movements like running, jumping, and changing directions quickly. Strong adductors can help prevent injuries such as groin strains and improve overall athletic performance.
2. Enhances Core Stability
The Copenhagen plank also significantly engages the core muscles, including the rectus abdominis, obliques, and transverse abdominis. A strong core is vital for maintaining proper posture, balance, and stability during various physical activities. It also helps protect the lower back from injuries.
3. Improves Hip Stability
Hip stability is crucial for both everyday movements and athletic activities. The Copenhagen plank targets the hip adductors and abductors, helping to create balanced strength around the hip joint. This balance can reduce the risk of hip-related injuries and improve overall mobility and performance.
4. Low Impact on Joints
Unlike some exercises that place significant stress on the joints, the Copenhagen plank is a low-impact exercise. This makes it suitable for individuals of all fitness levels, including those recovering from injuries or dealing with joint pain.
5. Unilateral Training
As a single-sided exercise, the Copenhagen Plank helps address muscle imbalances between the left and right sides of the body, promoting symmetry and reducing the risk of compensatory injuries.
6. Versatility
The Copenhagen plank can be modified to suit different fitness levels and goals. Whether you are a beginner looking to build foundational strength or an advanced athlete seeking a challenging variation, there is a version of the Copenhagen plank that can work for you.
Common Mistakes to Avoid
1. Sagging Hips
Allowing your hips to sag during the exercise reduces its effectiveness and can strain your lower back. Focus on keeping your hips lifted and your body in a straight line.
2. Improper Elbow Placement
Placing your elbow too far forward or backward can lead to shoulder discomfort. Ensure your elbow is directly beneath your shoulder for optimal support.
3. Overarching the Back
Overarching your lower back can lead to discomfort and reduce the engagement of your core muscles. Maintain a neutral spine position throughout the exercise.
4. Neck Strain
Keep your neck in a neutral position, aligned with your spine. Avoid craning your neck up or letting it drop.
5. Holding Your Breath
Holding your breath can increase tension and reduce the effectiveness of the exercise. Remember to breathe deeply and steadily throughout the plank.
Variations of the Copenhagen Plank
1. Modified Copenhagen Plank
For beginners or those with limited strength, the modified Copenhagen plank is an excellent starting point. Instead of placing your top foot on a bench, place your knee on the bench while keeping your bottom leg straight.
2. Copenhagen Plank with Leg Lift
To increase the challenge, add a leg lift to the Copenhagen plank. While holding the plank position, lift and lower your bottom leg without letting it touch the ground. This variation adds extra engagement for the hip abductors and core.
3. Copenhagen Plank with Pulses
Perform small pulses with your bottom leg while holding the Copenhagen plank. This variation adds an extra burn to the adductors and helps build endurance.
4. Copenhagen Plank with Arm Lift
Increase the difficulty by lifting your top arm while holding the plank position. This variation challenges your balance and engages the stabilizing muscles of the shoulder and core.
Incorporating the Copenhagen Plank into Your Training
To effectively integrate the Copenhagen Plank into your workout routine, consider the following guidelines:
Frequency: Start with 2-3 sessions per week, allowing for adequate recovery between workouts.
Sets and Duration: Begin with 2-3 sets of 10-30 seconds per side, gradually increasing as you build strength and endurance.
Placement in Workout: The Copenhagen Plank can be used as part of your core routine, as a stability exercise in lower body workouts, or as a component of circuit training.
Progressive Overload: Gradually increase the duration of holds, the number of sets, or progress to more challenging variations to ensure continued improvement.
Complementary Exercises: Pair the Copenhagen Plank with exercises that target opposing muscle groups, such as hip abductor exercises, to maintain muscle balance.
Conclusion
The Copenhagen plank is a versatile and effective exercise that can help you build stronger inner thighs and a more stable core. By incorporating this exercise into your fitness routine, you can improve your athletic performance, reduce the risk of injuries, and achieve a balanced and strong physique. Remember to start with proper form, avoid common mistakes, and progressively challenge yourself with variations and increased intensity. Whether you are a beginner or an advanced athlete, the Copenhagen plank can be a valuable addition to your training regimen.


